Posts

Showing posts with the label Rendering

How to Use the Corona Volume Grid

Image
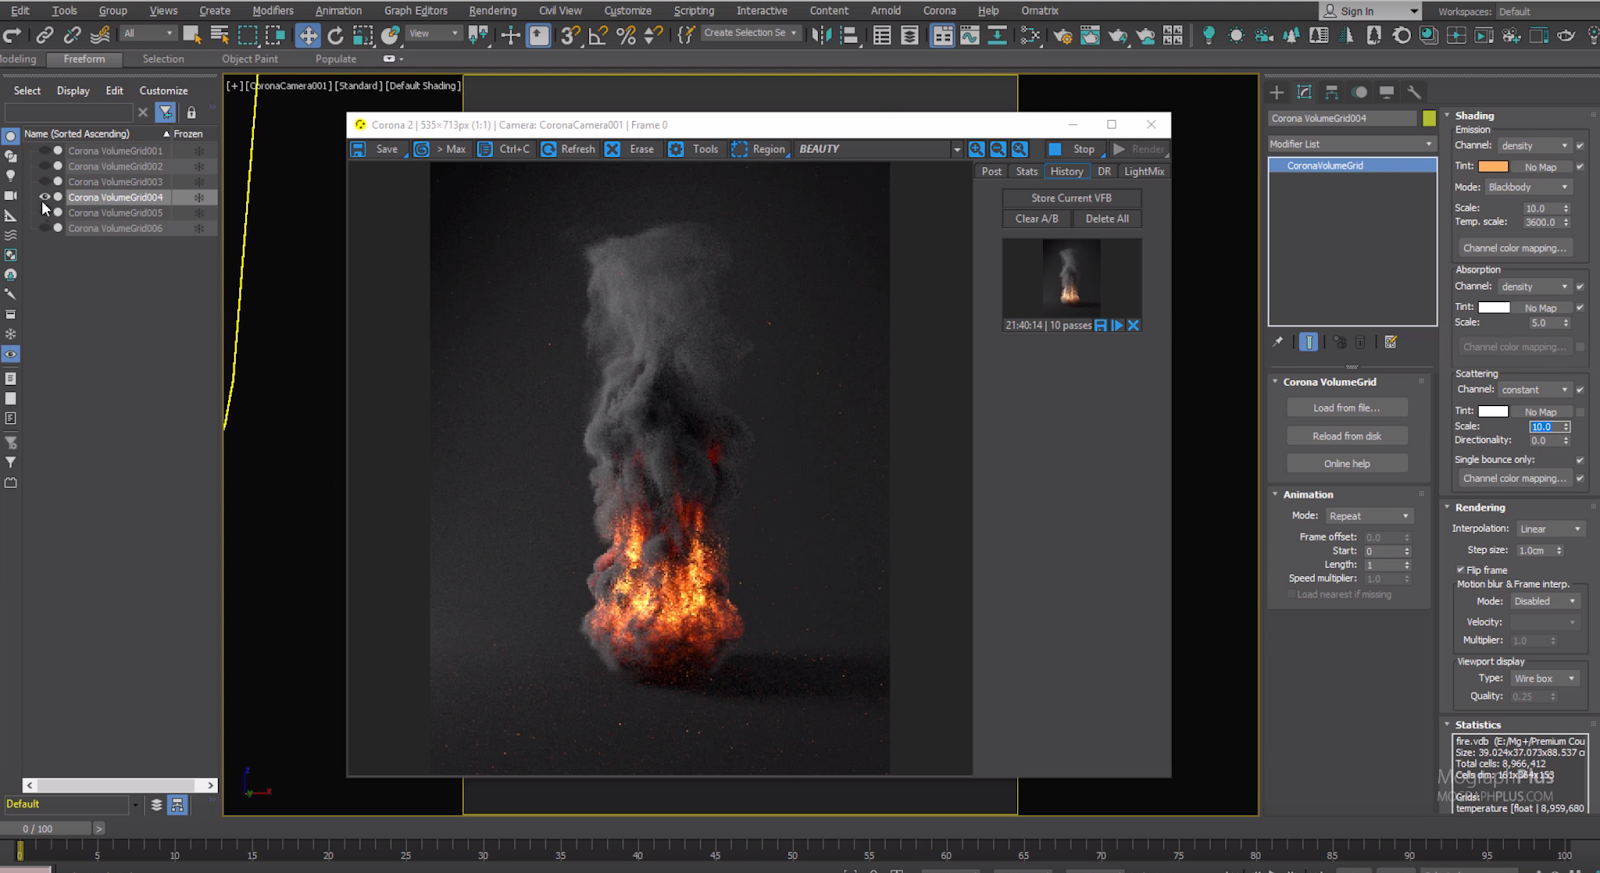
[ #CoronaRender ] Mograph+’s Kamel Khezri Shows How to Use the Corona Volume Grid for Rendering Smoke, Fire and Explosions. The tutorial is an expert from a larger course that offers 9 hours of Corona training for 3ds Max users. >> See Also: Corona Render 3.0 for 3ds Max with Nvidia AiDenoise [post_ads] More CORONA tutorial [post_ads_2]

Create a Detailed Mars Landscape Using Octane Displacement

Image
[ #Octane ] David Ariew shows us how to create a Detailed Mars Landscape Using Octane Displacement. Learn how to combine procedural noises to create terrains, then add multiple layers of displacement to them. We'll look deep into fog settings, composition, lighting, and color matching techniques. Next we'll learn how to create displacements by baking out C4D's default noise types, as well as jumping into World Creator for more advanced terrains. Finally, we'll create canyon walls and a vertical composition, as well as optimizing the scene. >> See Also: Intoducing Octane Render 5 [post_ads] More Octane tutorial [post_ads_2]

How to use V-Ray Multimatte Element tutorial

Image
[ #Rendering #VRay ] Jamie Cardoso shows us how to use V-Ray Multimatte Element tutorial. His in-depth video tutorial takes users through the process of preparing and using the V-Ray multimatte element, while providing a thorough insight into its core settings. >> See Also: How to setup Real Displacement texture Correctly in 3ds Max & V-Ray [post_ads] More Rendering tutorial [post_ads_2]

V-Ray NEXT for 3ds Max: The Next Generation of Rendering

Image
[ #Vray ] Check out Novedge webinar about how V-Ray Next for 3ds Max — Workstation — Digital Version can save time and enhance your renders. Chaos Group`s CG Specialist Anastasia Zhivaeva will demonstrate how to set up a scene with the new scene intelligence feature, speed up renders with NVIDIA`s AI denoiser, and add more control in compositing with denoised render elements. >> See Also: V-ray Cloud (Beta) Test by Nawras Ryhan [post_ads] More Vray tutorial [post_ads_2]

Making of Mercedes by Farid Ghanbari

Image
[ #Maya #SubstancePainter #VRay #Photoshop #AfterEffects ] Art Director/Founder of RenderBurger - Farid Ghanbari has shared the Making of Mercedes. The progress is combined in a 5 minutes time-lapse video.Check out how he played with textures in Substance Painter,Vray lights. Check out more his works from Artstation . Enjoy! >> See Also: Making of Warrior Dog 641 [post_ads] More Vray tutorial [post_ads_2]

Toon rendering with V-Ray Next for Autodesk Maya

Image
[ #Vray #adskMaya ] Christophe Desse shared a video about his workflows and techniques to achieve toon look with V-Ray Next for Autodesk Maya >> See Also: V-Ray Next for Autodesk Maya [post_ads] here are some results More Rendering tutorial [post_ads_2]

Material Basics in Redshift Renderer for Cinema 4D Tutorial

Image
[ #Redshift ] In this tutorial we'll be making and using a simple and versatile material preset for Redshift renderer in Cinema 4d. You can also download the preset here ! >> See Also: Redshift Blog [post_ads] More Redshift tutorial [post_ads_2]

Basic Studio Lighting for Automotive Rendering

Image
[ #Corona ] A tutorial from Apex Automotive on how to create a really simple indirect studio lighting set up. Software used was Corona 1.7 and 3ds Max 2018 but it will work with any render engine and 3D package. >> See Also: Corona Render 2 for 3ds Max You can download the scene file here ! [post_ads] More Automotive tutorial [post_ads_2]

Creature Shading Tutorial: Sub Surface Materials in V-Ray for Maya

Image
[ #VRayforMaya ] In this creature shading tutorial, We'll Learn how to set up a sub surface shading network in Vray for Maya using the Fast SSS material and a system of blends and coats >> See Also: V-Ray Next for Autodesk Maya [post_ads] More V-Ray for Maya tutorial [post_ads_2]

Creating Piece of Landscape in Cinema 4D

Image
[ #Cinema4D ] Niko Schatz shows us how to create Piece of Landscape in Cinema 4D [post_ads] More Cinema4D tutorial [post_ads_2]

Making Clay or Override Materials in Cinema 4D

Image
[ #Cinema4D #Shader #Rendering #Tutorial ] In this quick Tutorial Uwe Schweer-Lambers from Equiloud shows us how to make a useful clay or override material in Cinema 4D. Basically, this is simply a combination of a Fresnel shader with an Ambient Occlusion. Lights could be introduced into the scene, but it would also work without it and the best results are achieved using the Physical Renderer. >> See Also: Global Illumination Explained | V-Ray for Cinema 4d [post_ads] More Cinema 4D tutorial [post_ads_2]

Rendering Diamond in Cinema 4D

Image
[ #Cinema4D #Modeling #Redshift #Rendering #Photorealistic #Tutorial ] In this video, Valeriy Seleshko shares with us how we can create and render real Diamonds in Cinema 4D. He also explains how to setup Caustic Photons with Redshift. >> See Also: Creating an illuminated Flower in Cinema 4d [post_ads] More Cinema 4D tutorial [post_ads_2]

Brute Force GI Engine Explained | V-Ray for Cinema 4d

Image
[ #VrayforC4D #Cinema4D #Rendering #Lighting #Tutorial ] MographPlus shares with us in this new tutorial on the Brute Force Global Illumination engine in Vray for Cinema 4D. This aspect of the GI setting is also very important in getting the best out of a rendering. >> See Also: Global Illumination Explained | V-Ray for Cinema 4d [post_ads] More Vray for C4D tutorial [post_ads_2]

Houdini Sim to Rendering MotionBlur with Redshift in Maya

Image
[ #Houdini ] Ryan Knightley shares video which attempts to alleviate one of those kinks. Alembics of changing topology require a few extra steps to work properly with motion blur >> See Also: Redshift Blog [post_ads] More Redshift tutorial [post_ads_2]

Global Illumination Explained | V-Ray for Cinema 4d

Image
[ #Vray #Cinema4D #VrayforC4D #Rendering #Lighting #Tutorial ] In this video, MogGraphPlus explains to us what the Global Illumination is (as a matter of fact, it is what is responsible for making our renderings more realistic), as well as how it works in render scenes. They also explain how we can setup the light in our scene to complement the Global Illumination. >> See Also: Interior Lighting & Area Lighting In Vray for Cinema 4D [post_ads] More VrayforC4D tutorial [post_ads_2]

Creating Landscape in Houdini 16

Image
[ #Houdini #Modeling #Environment #Tutorial ] Aron Kamolz has released a series of videos that gives an overview of working with the landscape features introduced in Houdini 16. All of the necessary tools needed for the creation of the scene which includes plant scattering, texture setup, atmosphere setup were done in Houdini and rendered in Mantra. This was the first time he used Houdini for landscape as opposed to Vue, PlantFactory and World Machine. He shares his process with us in this tutorial. >> See Also: Methods for Converting HeightField Terrains to Game Engine Data in Houdini [post_ads] Click here to see the tutorials . More Houdini tutorial [post_ads_2]

Simulating Volumes, Fog & Displacement in Corona for C4D

Image
[ #CORONA #Cinema4D #CoronaforCinema4D #Rendering #Environment #Tutorial ] In this video, Shawn Astrom shows us how we can use Corona's amazing volume material for volumetric fog effects. Also, he explains how to create a realistic procedural landscape and how Corona fully supports Cinema's terrain mask shader! >> See Also: Atmosphere Creation with Corona for 3ds Max [post_ads] More Corona for Cinema 4D tutorial [post_ads_2]

Creating Worn-out Edges in Octane Render for Cinema 4D

Image
[ #Cinema4D #Modeling #Material #texture #Rendering #OctaneforCinema4D #Tutorial ] In this brief tutorial, Authur Whitehead shares with us how we can use the dirt node as a mask to direct bump maps on the edges of an object in Cinema 4D. This effect creates a worn-out effect that can be applied to various workflows. The HDRI used was gotten from here , while the texture was taken from Poligon . >> See Also: Making Advanced Octane Shaders in Cinema 4D | Part 2 [post_ads] More Cinema 4D tutorial [post_ads_2]

Redshift: Denoiser (Optix and Altus) Tutorial

Image
[ #Redshift ] Redshift Denoiser First Look Tutorial by Create 3d Characters - Timeline Scrubbing, Camera Navigation - Denoisers Nvidia's Optix and Innobright's Altus >> See Also: Redshift Render Blog CONTENTS 0:20 Scrubbing In The Timeline Feedback 5:10 Optix Denoiser 11:14 Optix And Bucket Rendering 12:45 Optix Vs Altus 17:35 Altus 23:35 Fine Texture Testing [post_ads] More Redshift tutorial [post_ads_2]

Creating an illuminated Flower in Cinema 4d

Image
[ #Cinema 4D #Modeling #Rendering #Lighting #Tutorial ] Niko Schatz brings to us in this detailed tutorial, how he creates a luminant flower inside of Cinema 4d. >> See Also: Create a Mountain in 4 steps in Cinema 4D [post_ads] More Cinema 4D tutorial [post_ads_2]